Do you ever find yourself staring at a reverb plugin, moving sliders around and hoping for the best?
This is pretty much what I used to do. When I first started out mixing, I would set the reverb type (hall, room etc.), choose how long I wanted it to last for, and the rest was… well it wasn’t really.
I would set pre-delay to something. I’d chuck in a dash of diffusion because… why not? And if it sounded good I’d leave it in there.
But that’s not really how we should be mixing, is it?
The settings that you’ll find on reverbs can shape your sound to achieve that perfect ambience. Some of these settings can be self explanatory in how they’re used, but others are less so. Let me explain exactly what these parameters do, so that you can properly take control of your sound.
What Is Reverb?
Reverberation (or reverb) describes the echos that are created when a sound hits a surface and reflects back to be heard by the listener.
The sound of the reverb is dependent on various characteristics of the room or space that the sound is bouncing around, such as it’s size, it’s shape and the materials that the surfaces are made up of.
A digital reverb plugin or hardware unit emulates this effect so that you can apply it to your audio, giving the listener the impression that it’s been recorded in a certain live space.
The settings or parameters that you’ll find on your reverb can be controlled to shape the reverb to match the sound that you’re after. Some of these settings can be self explanatory in how they’re used, but others are less so.
Below you’ll find a list of all of the most common reverb parameters explained in a nutshell. Click on each one for a more in-depth explanation.
The Common Parameters
- Type – The room sound that the reverb is emulating.
- Length/Time – How long the reverb effect lasts.
- Pre-Delay – How quickly the reverb starts after the triggering sound.
- Early Reflections/Tail – Early reflections are the first reflections heard after the audio starts. Tail is the decay of the reverb after the initial reflections.
- Size – The size of the emulated room.
- Width – The stereo width of the reverb effect.
- Diffusion – How dense/close together the reflections are.
- Equalizer (EQ) – EQ controls specifically for altering the reverb sound, rather than the track itself.
- Damping – The ‘softness’ of the emulated room.
- Dry/Wet – How much of the original audio is heard in relation to the reverberated audio.
- Output – For adjusting the overall level of the reverb.
Reverb Parameters Explained
Type
Unless you’re using a reverb plugin/unit that emulates a specific room type, you should have a few type options available. Hall and Chamber emulate the respective rooms they’re named after. Room will generally emulate a smaller room sound. Plate and Spring reverbs emulate a very specific type of man-made reverb sound. It’s worth playing around with these if you’re unsure how they sound.

Length/Time
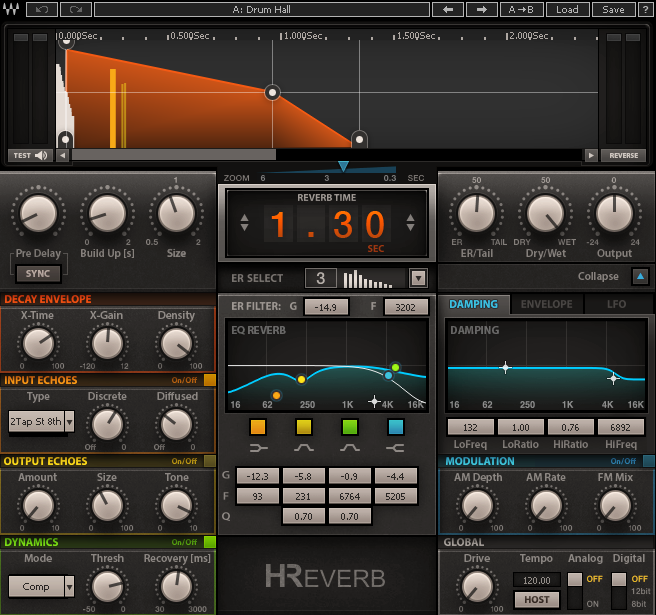
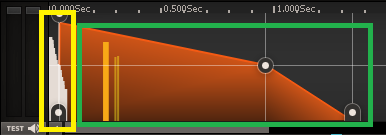
One of the most important settings on a reverb is also one of the most straightforward. Length is how long the reverb will last after it’s initially triggered by the audio. This will normally be measured in seconds and milliseconds on your plugin/unit. The longer you set this for, the longer you’ll hear the reverb for.
Pre-Delay
Pre-delay is the amount of time after the audio that the early reflections of the reverb kick in. Increasing the pre-delay can prevent the reverb from masking the raw sound. The longer the pre-delay gets, the larger the room sound.
Early Reflections/Tail
The early reflections are the first reflections that our ears would hear after a sound reverberates. Tail refers to the decaying reflections that you would hear after the sound has stopped. You may find a knob on your reverb that will allow you to blend between the two. Cranking up the early reflections will give the impression of being in a small room, whereas making your reverb tail-heavy would give you a ‘further away’ sound.
Size
Size refers to the size of the room that’s being simulated. This can be used in tandem with the other parameters to alter the room sound.
Width
The stereo width of the effect. This is often measured as a percentage, with 0% being the most narrow and larger percentages widening the effect. The width could also be affected by the stereo panning settings within your DAW.

Diffusion
The higher your diffusion setting is, the more dense/close together the reflections will be. Generally, higher settings can make for a more natural-sounding reverb and lower settings for a more ‘airy’ effect.
Equalizer (EQ)
For a basic understanding of what EQ is, have a read of this first. In terms of it’s use on a reverb – you can use the EQ to change how the reverb effect sounds, without affecting the audio. For example, applying a high-pass filter to lose some of the low end on the reverb tail can help to avoid a muddy low-end across the mix. Applying a low-pass filter can reduce harshness, and help to create a more ‘dampened’ reverb effect.
Your reverb may just have a high cut and low cut knob, which work in the same way, albeit with less flexibility.

Damping
Damping describes how ‘padded’ the emulated room comes across. More damping tends to make for a warmer tone as the higher frequency reflections are dampened, similarly to how a low-pass filter would sound.
Dry/Wet
The dry/wet control allows you to alter the balance between the untreated (dry) track and the track after reverb is applied. This is more useful for if you’re applying reverb directly to a track, as opposed to using an effects bus. It’s not found on all reverbs, but it can be very useful. It’d be on everything if it was up to me!
Output
The output knob allows you to make adjustments to the volume of the reverb effect. This can be useful for general adjustments to the quantity of reverb you need, and also for retaining the general level of the audio for a less biased comparison between the untreated and treated audio. That is to say that adding reverb can make the audio seem louder. And in turn, this can give you the impression that it sounds better simply because it’s louder. The output knob can assist with that.
Now that you have had all of the main reverb parameters explained, will you be making any changes to the way that you implement reverb? Leave a comment below! And if you’d like any of them explained further, just drop a comment and I’d be happy to help.
Of all the parameters that you explained very well, which are the basic minimum ones needed for a realistic effect? Thank you, Saki Koshy