Take a look at any pro mix session and you’ll find an EQ plugin sitting on (almost) every single track. EQ is an intrinsic part of the mixing process and is one of the first things you should learn when learning how to mix music.
EQ is not nearly as difficult to pick up as it may seem. Some EQ plugins are chock-full of knobs, faders and all manner of squiggly lines that can look like hieroglyphics to the untrained eye. Once you get familiar with the main functions though, you’ll be EQing like a natural.
What Is Equalization (EQ)?
For those unsure, an equalizer (or EQ) is effectively a very clever volume knob. Equalization lets you boost (accentuate) or reduce (attenuate) the levels of certain frequencies in your audio. With EQ, you can bend to your will the floor-shaking sub-bass frequencies, the crispy trebles, and everything in between.
If you’re not yet familiar with the basic types and functions of EQ, and how they work, please read Understanding EQ: The Basics first. This straightforward guide will teach you everything you need to know to get you ready for learning how to use EQ in mixing.
All set? Then let’s find out how to use EQ in mixing…
When To Use EQ In A Mix
Any plugin that you apply when mixing has to have a reason for its use. While there is definitely room for experimentation while mixing, this would normally come towards the end of the main mix. You should decide exactly what your goal is before applying any plugin or making any changes to parameters.
The Understanding EQ: The Basics guide goes over a couple of common uses to give you an idea of what EQ is used for. Now we’re going to look at some more specific reasons to use EQ in your mix. These are the five most common uses of EQ –
- Reduce or remove unappealing frequencies
- Create space in the mix for other other instruments
- Enhance certain desired frequencies
- To differentiate similar instruments
- To achieve a certain effect
How To Apply EQ
Once you’ve decided on what you’re trying to achieve with EQ, you’ll want to put it into action. The first step to this is loading up an EQ plugin onto the track in your DAW. Don’t get too hung up on which EQ to use. Most EQs generally do the same thing, and learning how to use it is far more important than learning the differences between different plugins. Your DAW’s stock EQ will do just fine.
Let’s take a look at how we can go about putting each of the five main EQ uses into action.
1. Reduce or remove unappealing frequencies
You should be considering removing the stuff that you don’t want before using EQ for anything else.
An audio track might have a certain frequency that was picked up during the recording stage that you just don’t want anywhere near your mix. Or certain frequencies might just not suit the tone that you’re aiming for for that instrument.
It’s best to remove these before doing anything else, or you’ll be mixing stuff that you don’t even want in the song!
A tried and true method of removing these is the “sweep” method. This is how it’s done –
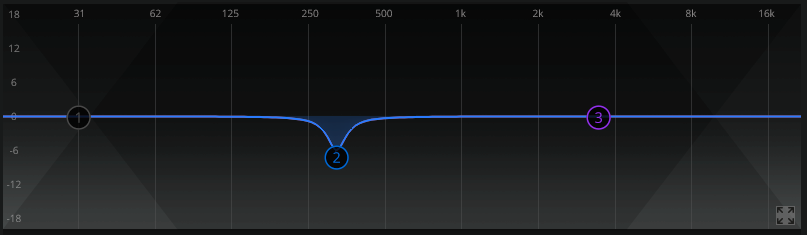
- Activate a bell curve EQ band with a narrow Q and a high gain (read the basics first if you’re unsure of any of these terms). This lets you hear specific frequencies much more clearly.
- “Sweep” the EQ band around where you expect the unwanted frequencies to be by moving the band left and right along the frequency spectrum.
- Once you’ve pinpointed the undesired frequency, reduce the gain so that it’s being cut, rather than boosted. It’s easier to use the gain knob for this, rather than dragging the band down so not to change the frequency setting in error.
2. Create space in the mix for other other instruments
This is where you’ll be considering the mix from a ‘macromixing’ perspective – the mix as a whole, rather than the individual tracks. It’s vital for creating a balanced mix to give each instrument its own ‘space’ in the frequency spectrum.
That’s not to say that you have to completely section off parts of the frequency spectrum for just one instrument. However, when you have certain instruments that cover a wide range of frequencies (e.g. electric guitar, vocals), you may find that some frequency bands just aren’t needed on that particular instrument. Removing some low end from the vocals and guitars, for example, helps to make room for the bass and kick drum. This prevents mudiness, without taking away anything of value from the vocals and guitars.
This is how you can use EQ in mixing to create space –
- Listen to the tracks together. You won’t know how one EQ change affects the other tracks if you’re listening in solo mode.
- Consider what you’re making room for. What are the main frequencies that need to stand out? What frequencies are overpowering in your mix?
- Decide which tracks do not need these frequencies.
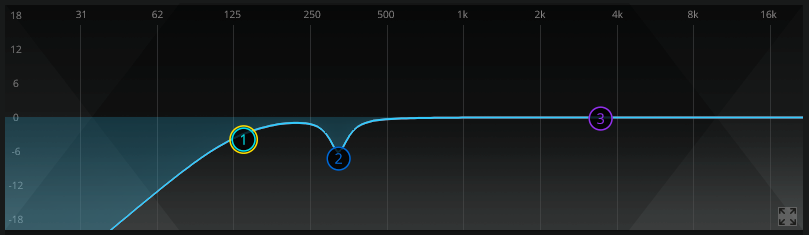
- Make EQ cuts in those areas. Filters (high-pass and low-pass) are normally preferable for this type of EQing.
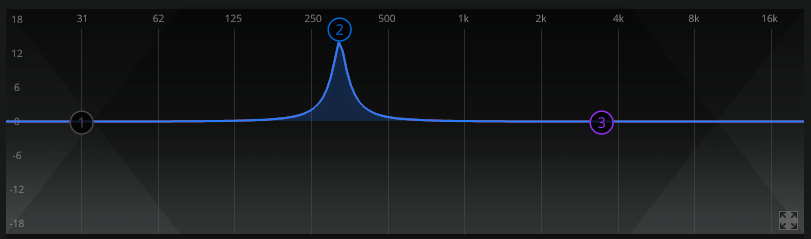
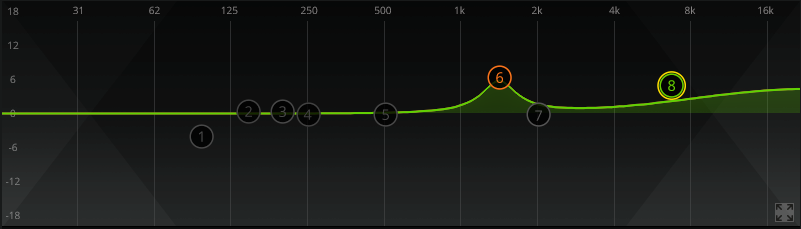
3. Enhance certain desired frequencies
Once you have achieved a general balance in your mix and you’ve removed undesired frequencies, you may want to boost certain frequencies that you’d like to stand out. Some common uses of EQ boosts include –
- Boosting low bass frequencies for a thumping kick drum
- Boosting mid bass frequencies for more body on the bass guitar
- Boosting the mids on electric guitars for more presence
- Boosting the upper mids to help vocals to stand out
- A high shelf boost on cymbals to give them a sizzling ‘sheen’
EQ boosts can be considered for any sound source. Mixing music is an art form and there are no rules for how you should be applying EQ boosts. However, I can make some suggestions on how to go about making EQ boosts.
Firstly, I recommend keeping the Q of the EQ boost quite wide, as opposed to the narrow Q suggested for EQ cuts. This helps to keep them sounding ‘natural’.
Secondly, avoid using the ‘solo’ button as much as possible when applying EQ boosts – you may find that things can sound a lot different in the context of a full mix.
And finally, don’t get too hung up on the values of the EQ settings (how many decibels, the exact frequencies) – your ears are what you should be paying attention to.
4. To differentiate similar instruments
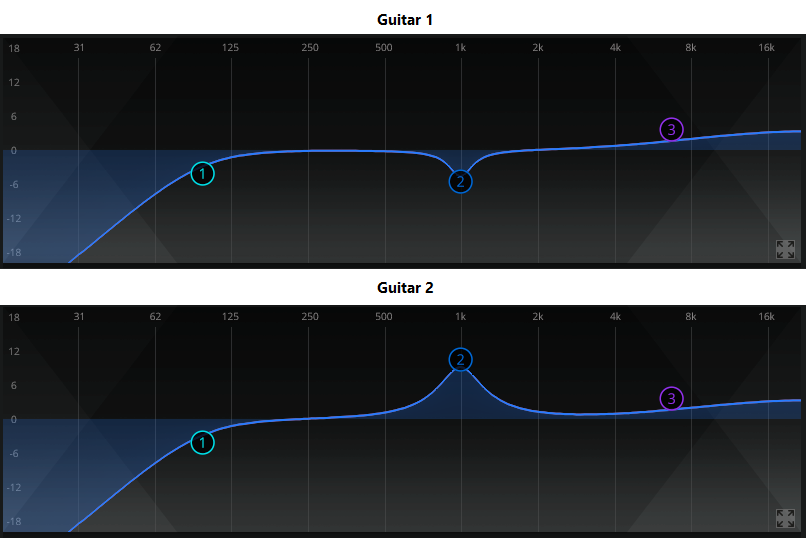
You may find after recording two similar instruments that in the context of the mix, they just don’t play nicely together. For example, say you’re mixing for a band with two rhythm guitarists. In the context of the mix, it may be hard to differentiate between the two tracks, especially when listening in mono.
EQ can be used to fix this in a similar way to how we discussed creating space in the mix. Simply apply an EQ boost of a desirable frequency to one of the two tracks and apply a cut of the same frequency on the other track.
I recommend mixing in mono when making these changes. Mixing in stereo will naturally make it easier for you to differentiate the two tracks, but for anyone listening to the mix in mono, the difference may not be so clear.
5. To achieve a certain effect
This is where EQ gets even more interesting. So far, we’ve learnt the essentials of how to use EQ in mixing that will get your mixes to sound balanced and generally awesome. There’s much more than you can use EQ for, though..
EQ can be used in endless ways to create interesting tones and effects. There are no rules to follow here. It’s about using what you’ve learnt to manipulate the sound or to simply experiment and try something new.
Some great ways to use EQ to create certain effects are –
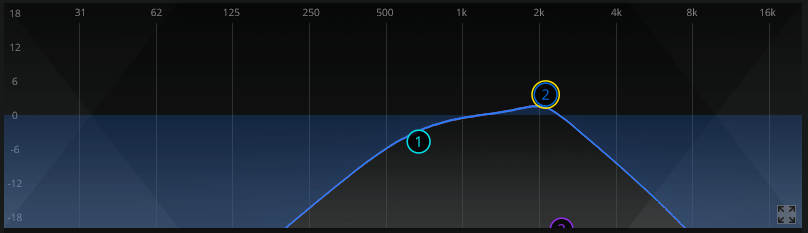
- Cutting out the lows and highs of a vocal track to create a ‘telephone effect’
- Automating a frequency sweep to build up to a section
- Removing the top end for a ‘next door’ effect
- Removing the bottom end for a tinny ‘earbuds’ effect
The possibilities are endless! I recommend getting to grips with the basics before spending too much time on this, though.
Essential EQ Tips
Whatever you’re using EQ for in your mix and however you’re using it, there are three things to always keep in mind.
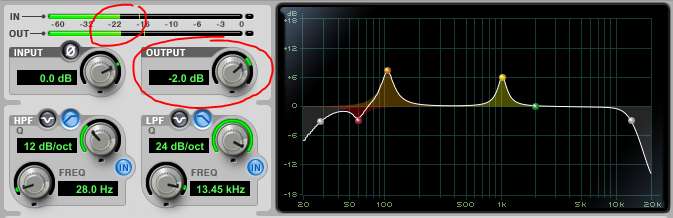
Firstly, don’t forget about makeup gain. If you make any kind of EQ boost or cut, use the makeup gain/output knob to bring the level of the audio back to what it was prior to EQing. This will enable you to easily compare the original audio with the processed audio. It’ll also prevent your EQing from affecting the level balance of the mix.
Secondly, don’t be afraid to use multiple cuts and boosts to achieve the desired sound. Ultimately, you want the audio to sound better, so try not to limit yourself if it’s needed. On the other hand, you should, always ensure that you know exactly why you’re making EQ changes before you make them, shooting in the dark doesn’t make for better mixes.
And thirdly, get your mix session set up and your levels balanced before you start EQing. Following a logical, step-by-step process to your mix will help you to make firm decisions on when it’s time to use EQ.
I’ve laid out my step-by-step mixing process in a free guide that you can follow along as you mix. It will help you to get started on your mixes and know when and where you should be EQing.
Pingback: Top 10 Audio Mixing Techniques Every Producer Needs to Know – groovene