Getting better mixes can take time. But if you focus on progressing just a little each day, you’ll soon start to notice results. I’ve put together 20 mixing tips for getting better mixes. I’ve included a few that you might not have thought of that aim to streamline your mixing process over the year and help you get better, faster.
Now, in no particular order, here they are!
1. Balance Levels Before Doing Anything Else
When you start a new mix, it’s tempting to go straight for the exciting stuff. But let’s clean things up a bit first and get things balanced. Getting the levels balanced across all of your tracks is the most important part of the mix.

Level balancing has the highest progress to time ratio out of all aspects of mixing. This means you’ll make a huge amount of progress towards your finished mix in a short space of time. It’ll also give you more clarity on exactly what the individual elements need when it comes to EQ, compression and adding effects. Read more on this here.
2. Revisit and Refresh Your DAW Templates
Templates are invaluable when it comes to mixing. They can save you a huge amount of setup time by saving your commonly used track/bus layouts and plugin settings into a template that you can call upon at the start of a new mix. How often do you update your templates though? A new year is a great chance to take stock and work on streamlining things.
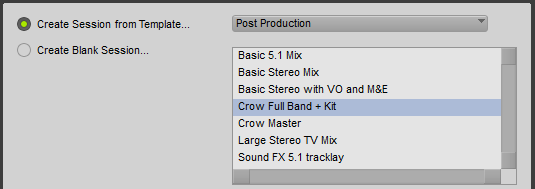
If you’re like me, something about your usual workflow will change every now and then. A new go-to reverb that you use on every mix, a new track layout… Now take a look through your templates. If any of your go-tos and preferred workflow setups are missing, update those templates now and save a ton of time over the year!
3. EQ Main Vocals and Backing Vocals Differently
This is especially important if the vocals have been recorded with the same singer and microphone. It can be hard to achieve a clear backing vocal if multiple, tonally similar vocals are fighting to be heard. Varying the EQ usage between the two can be very effective. For example, try using a high shelf on the main vocal and a low pass filter on the backing vocals cutting off the top end. You should achieve more clarity without having to increase the level.
4. Have a Good Reason for Changing Your Compressor Settings
Understanding compression is key to getting better mixes. When you’re first learning how to use compression, it’s easy to get carried away and slap a compressor on every track. When I was a beginner, I often used visual cues such as the gain reduction meter and just drag the sliders around until it looked and sounded more or less right.
Why exactly are you dragging those sliders though? It’s important to make sure that every single change you’re making on your compressor is intentional and is made in pursuit of a certain result. If you’re not 100% clear on exactly what the different functions of a compressor do, take a look at this video below where I simplify things –
5. Use A Mix Bus
It took a long time for me to bother with this one, but now there’s no turning back. Sending all of the audio tracks in your mix to a mix bus before they go to the master fader is a great idea for a few reasons. Firstly, you can use it to subtly tweak the whole mix for a sense of cohesion or ‘glue’. It can also by useful for automating levels on the whole mix, which brings me onto the next tip…
6. Boost the Overall Level for the Choruses
I try not to make too many sweeping changes on the full mix, a change that you want to make won’t be relevant for every instrument most of the time. However, automating a small level boost on your mix bus on the choruses, even just by half a dB or so can really help them to stand out.
7. High Pass Filter Generously
Learning to use high pass filters (HPFs) on the majority of tracks is possibly the biggest revelation that I ever had when learning to mix in college. Cutting out unwanted low end does wonders for improving overall clarity in the mix and in helping the bass instruments cut though. It’s even worth considering using HPFs on bass instruments up to around 30Hz to help remove low-end rumble.
8. Make Use of LCR Panning
Hearing something in one ear that’s completely different from what you’re hearing in the other ear creates an ultra-wide perceived width in your mix. Recording an instrument twice and panning one hard to the left and the other hard to the right gives you this wide effect. I go over this in the video below.
Alternatively, recording a completely different instrument or backing melody and panning them hard left and right can be even more effective at creating width, while giving clarity to the main central track.
9. Sidechain the Kick to the Bass
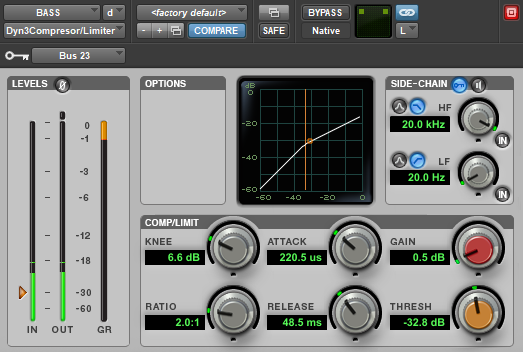
You might have heard this one before, but if you haven’t – take note. Using sidechain compression to duck your bass every time the kick hits is very effective when balancing the bass response across the mix, and making sure both can be heard clearly.
You’ll need to place a compressor on the bass that supports sidechaining, and send the kick to a bus. You then set the sidechain on the compressor to that bus and it’ll activate whenever the kick hits. Just keep the compression ratio relatively low to avoid a ‘pumping’ effect.
10. Have a Plugin Clear Out
How many of your plugins do you actually use? Be honest. I had an accidental plugin clear out a few months ago when I had to reinstall everything on my machine. I reinstalled all the plugins that I could remember, but I found that my plugin lists weren’t quite as long as they used to be… but it didn’t matter!
Over the years you’ve probably accumulated free plugins or there might be plugins that you’ve superseded with newer versions and you’ll never use the old ones again. They don’t need to be there. They’re wasting your time with their presence, making searching for plugins take a little longer every time you have to scroll down the list. Not to mention your DAW has to dig through them every time it launches. Take a few minutes to look through your list and uninstall the clutter.
11. Cut Levels Before You Boost Them
There was a point where my mindset completely changed with this one. And if you find yourself constantly having to drag the mix bus or every track fader down because you keep hitting the output ceiling, I suggest you try this too. When balancing levels, especially towards the beginning of the mix where the largest changes take place, try thinking “Which tracks are too loud?” and reduce the level, rather than thinking “Which tracks are too quiet?” and boosting. This simple mindset shift will all but remove the output ceiling issues you’re having.
12. Sidechain Vocals to Rhythm
We’ve talked about sidechaining bass to kick, but where else in our mix can sidechaining be useful? In a busy mix with a lot of mid-range information, it might be beneficial to sidechain the vocals to the main, central rhythm instrument such as the rhythm guitar. When used subtly, this can help ‘glue’ the mix together and help avoid a mix that’s too dynamic.
I really do mean subtly though, stick to around a 2:1 ratio with a fast release to avoid that ‘pumping’ effect on the rhythm.
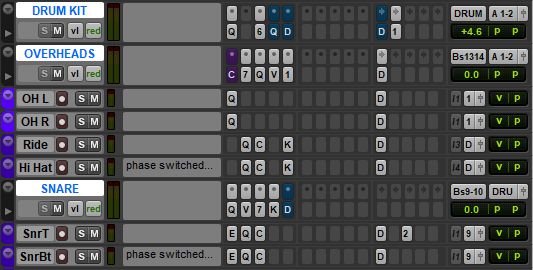
13. Busses for All Your Instrument Groups
If you have any tracks that need processing in exactly the same way as each other, I recommend sending them to a single aux/bus channel. This way, you can make quick changes on the bus rather than having to make the same change on each individual track. In addition, your processor will thank you when it only has to deal with one instance of each plugin.
For example, if you’ve recorded a guitar amp with two mics, and you want to use exactly the same compression settings on both, send them both through a bus and apply the compressor to the bus. Or if you want to add a little extra low end to your two snare tracks, but don’t want to make any changes to the individual tracks, you could send them through a bus (before they reach the main drum bus) and slap an EQ on there.
14. Automate Your Delays
While a subtle delay across the whole of your vocal track is a great way of giving it some space, you may want to use certain delays only at certain points in a song. Automation enables you to only have the delay kicking in (or give it a boost) at certain points in the song. My favourite technique for this is giving the delay a boost in level at the end of a vocal phrase and bringing it back down before the next phrase starts. This means the listener can hear those lovely delay effects that you’ve crafted more clearly and prevents things from getting messy while the main vocal is playing.
15. Pay Attention to the Order of your Plugin Chain
Plugin order matters, people! This is one that took me a little while to take notice of when I first started mixing. It was once I started using physical mixing desks that it really clicked. Imagine a mixing desk channel. The audio enters the channel and is normally passed through each section in sequence. First the gain, then the EQ and so on. This is how it works in your DAW, too.
So, keep in mind the order that you want things to be processed. My suggestion is to remove any audio that you don’t want before applying other effects. For example, start out with filters, EQ cuts, de-esser etc., and consider adding compression and EQ boosts after to ensure that you’re only affecting the audio information you want to keep.
16. Have Two or Three Reverbs Ready to Go
Remember we talked about how useful DAW templates are? One of the most useful things to have in your mixing templates are a couple of auxiliary channels with a different style of reverb on each one. A hall, a plate etc.
In my experience, most singers like to have a little reverb in their monitor to hear a vocal that’s more natural sounding and less up-front. Being able to quickly slap on a plate when asked, rather than messing around with settings while they wait, not only makes for a better recording experience but also gives you a better idea of how the vocal will fit in the mix right from the get go.
17. Don’t Forget About Low Pass Filters
High pass filters are commonplace, but how often do you use low pass filters (LPFs) in your mixes? LPFs can be useful on kick and bass tracks to remove unneeded high-frequency information. They can also be used in a more obvious way as a production technique to help a backing vocal or synth part stand out. Automation can be used in tandem to then role off the LPF for the chorus to really bring the mix to life.

18. Mix on Multiple Speakers/Headphones
It’s common for engineers to mix and check mixes on two or more sets of monitors. It’s good practice ensure that the mix sounds right from multiple sources, not just your speakers in your studio – because no-one else will be listening to it on your speakers in your studio!
Two pairs of expensive studio monitors aren’t going to be available to everyone, though… but it doesn’t matter. Do you have a pair of hi-fi speakers? Some Apple AirPods? A car? Even though these aren’t going to give you an accurate, flat response, it’s still worth checking on cheaper devices like these so you can get an idea of what the mix might sound like to the average listener.

19. Use Reference Tracks
This one’s useful for beginners and experts alike. Having a commercial track that you like the sound of in your mix session can be a great help when giving yourself something to aim for. This can be especially useful if you’re using a new pair of monitors to get your ears tuned to how everything should sound on them.
My use of reference tracks nowadays is mainly for when a client has suggested a track that they’d like the final product to sound similar to. I can listen to the track at various points throughout the mix and ensure that I’m achieving the sound that they’re after.
20. Just Keep Mixing!
Doing more mixes will make your mixes better. Period. I cannot stress this enough. It can take thousands of hours of working on your craft to master it. If I could give you just one tip to take away from this to improve your mixes over 2020, I would give you this one – mix more music! ?
–
How many of these tips do you plan on applying to your mixes? If you want me to expand on any of them just drop a comment below. Here’s to getting better mixes!